
Do you dream of warm, rich music filling your room, the kind only a vacuum tube amplifier can produce? Many music lovers chase that perfect sound. However, buying a ready-made tube amp can cost a lot of money. If you want that classic sound without emptying your wallet, building your own kit is a fantastic option. But where do you even start? Choosing the right DIY tube amplifier kit feels overwhelming. You face confusing jargon, endless parts lists, and worry about making a mistake during the build.
This confusion stops now. We break down everything you need to know to pick the best DIY kit for your skills and budget. By the end of this post, you will feel confident choosing components, understanding what makes a great kit, and finally starting your rewarding build. Get ready to solder, learn, and listen to your own masterpiece!
Top Diy Tube Amplifier Kit Recommendations

- 【Eight 470uf Capacitor Filter】:Eight 470UF capacitor filter is very clean, excellent power system to no hum, filaments are powered with DC 12V and need to be connected in series in order to reduce noise.
- 【Funtion】:This vacuum tube amplifier can connect the 6J1 tube pre-amp between sound source and amplifier, it will effectively filter digital flavor, the music and human voice will be relatively good.
- 【High Frequency And Low Proof】:The eight 470UF capacitors included in the DIY tube amplifier kit have very clean filtering, and the power system is excellent and noise-free. The filament is powered by DC 12V and needs to be connected in series to reduce noise.
- 【Assemble Yourself】:This diy amplifier kit comes in parts so you can assemble them together by yourself, enjoy the process of building your own tube amplifier.
- 【Easy To Use】:This vacuum tube amplifier uses a DC 5.5*2.1 socket and an AC 12V transformer. You can also use an AC 12V transformer. No plug is needed, just solder the power cord to the circuit board.
- 【Funtion】: This vacuum tube amplifier can connect the 6J1 tube pre-amp between sound source and amplifier, it will effectively filter digital flavor, the music and human voice will be relatively good.
- 【Eight 470uf Capacitor Filter】: Eight 470UF capacitor filter is very clean, excellent power system to no hum, filaments are powered with DC 12V and need to be connected in series in order to reduce noise.
- 【High Frequency And Low Proof】: The eight 470UF capacitors included in the DIY tube amplifier kit have very clean filtering, and the power system is excellent and noise-free. The filament is powered by DC 12V and needs to be connected in series to reduce noise.
- 【Assemble Yourself】: This diy amplifier kit comes in parts so you can assemble them together by yourself, enjoy the process of building your own tube amplifier.
- 【Easy To Use】: This vacuum tube amplifier uses a DC 5.5*2.1 socket and an AC 12V transformer. You can also use an AC 12V transformer. No plug is needed, just solder the power cord to the circuit board.

- NEW two-way 6E2 magic eye tube audio level indicator driver kit, suitable for DIY enthusiasts or installed in your gallbladder power amplifier, PCB board can be fixed in any cabinet amplifier, connecting the tube seat with flying wire. NOTE: This product can only give people a visual sensory experience, it is not a power amplifier. Tips: Shipped items as the first main picture shows, and the other pictures are only for reference.
- Two 6E2 tube magic eye drive board: audio signal that enables the 6E2's screen column to follow the size and flashing, the screen glow area is proportional to the signal size, when no signal, the luminous area is the most small, strong signal. The upper and lower light bands expand from both ends to the center until they overlap, excitation in the alterging signal.The 6E2's green electric-eye screen changes with the signal, lifelike like a cat's eye.
- The circuit of this drive board adds a first-stage amplification circuit to improve Input sensitivity, input device impedance of 100K, the board is equipped with 100K precision multi-turn adjustable resistance W1, W2, can adjust the input sensitivity, applicable a variety of signal options can be connected to the front-level audio signal output or the amplifier's horn output. W3, W4, which can adjust the screen opening amplitude,makes the left and right channels symmetrical at static time.
- This PCB board is a dual panel with a small form factor, reducing the required mounting space, easy to add to the existing equipment,installation use more flexible and convenient.Bile tube wire flying wire connection, so that the PCB board can be freely fixed position. PCB size: 76x42mm/2.99x1.65 inches; Fixed hole center distance: 64x34mm/2.52x1.34inch.
- The magic eye tube seat 1 foot (gate pole input), 2 foot (similar to anodes, 2, 6, 8 foot inside is connected can be connected feet.Tubes are different or slightly different), 3 foot (ground, cathode), 7 foot (similar to curtain gate adjustable light band open and close scale, 7, 9 at the bottom of the tube seat connected). 4,5 foot (filament), the 4 and 5 of two tubes can be connected freely, but it is necessary to distinguish between parallel(6.3v) or series(12.6v) wiring methods.

- 【Definition】 A valve amplifier or tube amplifier is a type of electronic amplifier that uses vacuum tubes to increase the amplitude or power of a signal.
- 【Function】 Connect this preamplifier to the audio source with 6J1 tubes and effectively filter the digital flavor. Tube amplifiers produce a warmer or more valve sound, make music and the human voice is relatively good.
- 【Capacitor Filter / Coupling Capacitor】 Eight 470UF capacitor filters are very clean, excellent power supply does not cause humming, filaments are supplied with 12 V DC and must be connected in series to reduce noise. The coupling capacitor is a high frequency electrodeless electrolytic capacitor and low resistance.
- 【Features】 With the DC 5.5 * 2.1 socket and 12V AC transformer, you can also use a 12V AC transformer without a plug. All you have to do is weld the power cord to the circuit board.This kit is available in parts so you can assemble it yourself and build your own tube amp.
- 【Customer Service】 Thincol has always strived to provide customers with high quality products and outstanding customer service. If you encounter problems during the purchase or during use, would you us? then we will do our best to serve you and protect your interests.
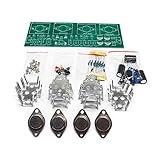
- Circuit Board Size: Glass Fiber Board 22.4cm*7cm, Working Voltage: Double AC 12V
- Fully Separated Components, Four High-power Triodes, Two Stereo Channels, Each Channel can Reach to 100W.
- The Power Amplifier Circuit of Household Power Amplifier and Active Speaker has a Good Effect.
- This Power Amplifier Uses a Typical OCL Circuit, Which Has the Advantages of High Stability, Wide Frequency Response Range, Good Fidelity, etc. This Circuit is Often Used in High-Fidelity Sound Reproduction Equipment.
- This OCL Stereo Amplifier is Suitable for the Assembly and Uuse of Electronic Enthusiasts and Audiophiles.

- DIY pedal kit - assembly and soldering required.
- 5W output power into 8 Ohm
- 1 channel
- Vintage channel controls: bass, treble and volume
- Vintage pilot lamp and screw-on jewel cover for power-on indication

- FE-6J1-2.0B designed for music enthusiasts design and development.
- 1.AC 12V input:Using DC5.5 * 2.1 socket, 12V AC power adapter is available, you can also use 12V AC transformer, if you use 12V AC transformer, power lines need to solder on the circuit board. Remember: You can not use a for DC power input, otherwise it does not work!
- 2. the left-channel input / right channel input:o signal input, can be connected to mobile phones, computers, M3, MP4, and other music players.
- 3. the output of the left channel / right channel output:The o signal output terminal can be connected to the o signal input amplifier, power amplifier boards, to provide post-amp Bile flavor of music to enjoy!
- 4.the power switch / volume knob:The knob counter-clockwise to decrease the volume beginning, when the volume down to the minimum, if it continues to rotate until the "ticking" sound, then the power off, the light goes off.In the off state, turn the knob clockwise to hear "tick" sound, light is on, the power is turned on, then the volume is minimal, then continue clockwise rotation is to increase the volume.

- Clean and Efficient Design: This 6J1 tube valve amplifier, vacuum tube amplifier kit and 6J1 tube preamp features a well organized board layout with eight 470UF capacitors for effective capacitance filtering; The clean design enhances signal integrity and ensures optimal performance
- Clean and Low Noise Operation: The electronic tube stereo employs an excellent power supply system, featuring four 470UF capacitors for effective noise filtering; The tube filaments are connected in series, and a AC12V power supply is used, 6J1 valve preamp effectively reducing unwanted noise; With a 0.85 times magnification factor, this valve preamp tube provides an ideal balance of audio amplification
- Enhanced Circuitry: Designed with inspiration from the renowned music fidelity X 10D, this preamplifier diy kit and 6J1 vacuum preamp amplifier has undergone rational optimization,tube amp kit, resulting in improved stability compared to the original design; Expect a 10% increase in tube performance for a richer audio experience
- High Quality Components: The 6J1 valve preamp utilizes top notch components, preamplifier musical fidelity kit and electronic tube preamplifier including series non polar capacitors, high frequency low resistance electrolytic capacitors, 1% precision metal film resistors, and J class military regulation tube 6J1; These components contribute to superior sound quality
- Versatile Power Supply: The phono preamp's power supply circuit accepts a single 12V AC input and incorporates a built in boost function; This electron valve pre amp tube design allows for reliable operation even with low supply voltage, ensuring consistent high pressure 6J1 tube preamplifier performance
The DIY Tube Amplifier Kit Buying Adventure: Your Guide to Great Sound
Building your own tube amplifier kit is an exciting project. You get awesome, warm sound and the satisfaction of making something yourself. This guide helps you pick the right kit for your first build or your next upgrade.
1. Key Features to Look For
When you shop for a DIY tube amp kit, certain features really matter. These parts determine how easy the build is and how good the final sound is.
Sound Quality and Tube Type
- Tube Configuration: Kits often use different tube setups (like single-ended or push-pull). Single-ended amps are simpler and offer a very warm, classic sound. Push-pull amps are usually louder and more powerful.
- Tube Compatibility: Check what tubes the kit uses (like 12AX7, EL84, or 300B). Some tubes are easier to find or cheaper to replace than others.
Power and Connectivity
- Output Power (Watts): This tells you how loud the amp can play. If you have very efficient speakers, a lower wattage (3-5W) is fine. For standard speakers, look for 10W or more.
- Input/Output Options: Make sure the kit has the inputs you need (RCA jacks are standard). Some kits include headphone jacks or Bluetooth options.
Ease of Assembly
- Documentation Quality: Good instructions are crucial. Look for kits that include clear, step-by-step manuals, perhaps even with photos or videos available online.
- Pre-Soldered Components: Beginners should look for kits where larger components or transformers are already wired or mounted. This cuts down on difficult soldering.
2. Important Materials That Matter
The components inside the box seriously affect the amplifier’s lifespan and sound quality. Don’t just look at the price; look at what they give you.
Transformers
Transformers handle the high voltages and are the “heart” of the amp. High-quality kits use heavy, well-shielded power and output transformers. Poor transformers introduce noise and hum.
Capacitors and Resistors
These small parts control the signal flow. Kits using high-fidelity (audiophile-grade) capacitors and metal film resistors usually sound clearer and last longer than kits using basic, low-cost parts.
Chassis and Wiring
The metal box (chassis) protects you from the high voltage. A sturdy, thick metal chassis is better for safety and helps reduce vibration that can cause noise. Look for good quality copper wiring inside the kit.
3. Factors That Improve or Reduce Quality
You can buy a decent kit, but small upgrades can make a huge difference in sound.
Quality Boosters (Improving Sound)
- Point-to-Point Wiring: Higher-end kits use this method, where components are wired directly to each other. This often results in a cleaner signal path than using a pre-made circuit board.
- Tube Sockets: Ceramic tube sockets are much better than cheap plastic ones. They hold the tubes securely and handle heat well over time.
Quality Reducers (Things to Avoid)
- Cheap Potentiometers: The volume knob (potentiometer) can become scratchy quickly if it is low quality. Read reviews to see if others complain about the volume control failing.
- Missing Grounding Points: If the kit does not clearly explain how to properly ground all the metal parts, you will likely end up with a loud, annoying hum in your speakers.
4. User Experience and Use Cases
Think about where and how you plan to use your finished amplifier.
Beginner vs. Experienced Builders
If this is your first electronics project, choose a “Beginner” or “All-Inclusive” kit. These kits often use robust PCBs (Printed Circuit Boards) that make component placement easy. Experienced builders might prefer “Point-to-Point” kits for maximum customization.
Use Cases
- Desktop Listening: If you are powering small bookshelf speakers in a quiet office, a low-power (3W) single-ended amp is perfect. The sound will be intimate and rich.
- Main Stereo System: If you need to drive large floor-standing speakers in a big room, ensure your kit provides adequate power (15W+ in push-pull configuration).
10 Frequently Asked Questions (FAQ) About DIY Tube Amplifier Kits
Q: Do I need special tools to build a tube amp kit?
A: Yes. You definitely need a good soldering iron, solder, wire cutters/strippers, and a multimeter to check your work. A basic screwdriver set is also necessary.
Q: Are tube amps dangerous to build?
A: They can be. Tube amplifiers use very high voltage (often over 300 volts), which can cause serious injury. Always unplug the unit and wait at least 30 minutes before touching internal components, as capacitors can hold a dangerous charge.
Q: How long does it usually take to build a kit?
A: For a first-timer, expect to spend anywhere from 8 to 20 hours. This includes reading instructions, careful soldering, and troubleshooting any initial issues.
Q: What is the “warm sound” people talk about?
A: Tube amplifiers naturally produce a type of distortion that many listeners find pleasant. It sounds richer, fuller, and less harsh than modern digital amplification.
Q: Will I need to buy tubes separately?
A: Most beginner kits include the necessary tubes. However, advanced kits sometimes require you to purchase specific NOS (New Old Stock) tubes for the best performance.
Q: What is the difference between a kit using EL84 tubes versus 12AX7 tubes?
A: 12AX7 tubes are usually used in the pre-amplifier stage to boost the tiny input signal. EL84 tubes are power tubes that drive the speakers and determine the final output wattage.
Q: What if I mess up the wiring?
A: Don’t panic! If you use a multimeter correctly, you can check continuity and resistance between points to find errors before plugging the amp in. Good documentation helps prevent mistakes.
Q: How often do I need to replace the tubes?
A: Depending on how often you listen, power tubes (like EL84s) might last 3,000 to 10,000 hours. Signal tubes (like 12AX7s) can last much longer, sometimes 10 years or more.
Q: Can I use these amps with any speakers?
A: You must match the speaker impedance (Ohms) to what the amplifier is rated for (usually 4, 8, or 16 Ohms). Using the wrong impedance can damage the amplifier’s output transformer.
Q: Are DIY tube amps cheaper than buying a pre-made one?
A: Yes, usually. You save significantly on labor costs. A kit costing \$300 might result in an amplifier that sells pre-built for \$700 or more, assuming you build it well.