
Does your yard look like a messy battlefield after a windy day? Leaves, grass clippings, and small twigs pile up fast. Cleaning this mess by hand takes forever. You might even use a leaf blower, but that just pushes the mess around. It never truly collects everything neatly.
Choosing the perfect pull-behind lawn sweeper can feel like a chore itself. There are so many sizes, brush types, and features to consider. Should you get a big one or a small one? Will it handle wet leaves? These questions stop many homeowners from getting the tool they really need to keep their lawn spotless.
This guide cuts through the confusion. We will break down exactly what makes a great lawn sweeper. You will learn the key features to look for, how to match a sweeper to your yard size, and which models offer the best value. Stop wasting weekends wrestling with yard debris.
Ready to transform your cleanup routine from a nightmare into a quick task? Let’s dive into the world of pull-behind lawn sweepers and find the perfect match for your tractor or ATV.
Top Pull Behind Lawn Sweeper Recommendations
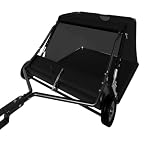
- EFFICIENT LARGE AREA CLEANUP: 42 in sweeping width helps collect grass clippings, leaves, and small twigs more efficiently across lawns and outdoor spaces
- ADJUSTABLE SWEEPING PERFORMANCE: Brush height adjustment allows brushes to penetrate grass up to 1/2 in deep for more effective debris pickup across lawn surfaces
- HIGH-CAPACITY DEBRIS COLLECTION: Extra-large 12 cu ft hopper bag holds more lawn debris to reduce unloading interruptions during seasonal yard cleanup projects
- CONVENIENT TRACTOR SEAT DUMPING: Easy-to-use dumping rope allows quicker hopper emptying without needing to dismount from the riding lawn mower or tractor seat
- DURABLE DESIGN: Equipped with 11 in x 2.5 in semi-pneumatic wheels for smoother transport and backed by a 3-year limited warranty for lasting outdoor use

- Adjustable Brush Height: Quickly set the brush height with a simple lever—no tools needed. The lawn sweeper easily adapt to lawns, sidewalks, driveways, and yards for consistent cleaning results.
- 52-Inch Wide Sweeping: Our tow-behind lawn sweeper cover more ground in a single pass with a 52" sweeping width. Enhanced metal-to-brush contact and 11" diameter brushes boost efficiency in collecting leaves, grass clippings, and light debris.
- Effortless Lawn Cleanup: Connect the grass sweeper to your lawn tractor and let the rotating brushes handle the work. It quickly picks up leaves, pine needles, twigs, and other dry debris quickly, reducing manual raking, making lawn maintenance easy and efficient.
- High-Capacity Collection Bag: The grass and leaf collector comes with a durable, non-woven bag that holds up to 26 cu.ft. of yard waste. The top cover keeps debris contained, while the dump rope lets you empty contents directly from the tractor with ease.
- Pre-Assembled & Space-Saving Storage: Our yard sweeper comes with pre-installed parts to minimize assembly time. Includes a detailed manual and video guide. Folds easily for compact storage in sheds or garages.

- Unique Anti-Splashing Cover Design: YINTATECH lawn sweeper features an exclusive design with a mesh cover that prevents branches, leaves, stones, and other debris from splashing, helping to reduce accidental injuries and enhance user safety
- Adjustable Sweeping Brush Height: You can adjust the height of the sweeping brush on the yard sweeper pull behind up to 2 inches; The minimum depth allows the brush to penetrate the grass by 1/2 inch for more efficient debris pickup
- Easy to Install and Use: Each tow behind sweeper comes with detailed instructions and an installation video; Simply attach the leaf collector to your lawn tractor, ATV, or UTV using the universal hitch pin; The high-density brushes effectively collect leaves, dry debris, pine needles, small branches, grass, and gravel; Keep your yard, patio, lawn, garden, or driveway clean and tidy with ease
- Folding Storage:The 50" pull behind leaf sweeper folds down to 30% of its initial size for compact storage; This tow lawn sweeper can be stored neatly against a wall Easy-Empty Dumping Rope:YINTATECH grass sweeper is equipped with a dumping rope that allows you to empty collected debris quickly and easily without ever leaving the tractor seat 10" Anti-Slip Wheels: Two 10" semi-pneumatic wheels provide the YINTATECH lawn sweeper with smooth movement and reliable traction across different surfaces
- Component Materials: Body: Alloy Steel Bristles: High-strength Polypropylene (PP) Hopper Bag: PVC + Polyester Finish: Powder-Coated Surface YINTATECH leaf collector package includes: Sweeper housing, offset dumping rope, anti-splash cover, hopper bag, steel hopper tubes, hardware, two 10"" wheels, and a user manual

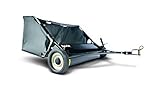
- HIGH-CAPACITY DEBRIS COLLECTION: Large 28 cu ft flow-through hopper bag fills from back to front for improved debris collection and fewer unloading interruptions
- EFFICIENT LAWN CLEANUP PERFORMANCE: Picks up grass clippings, leaves, and even pinecones while providing up to 2 times more capacity than traditional 3-bin baggers
- SMOOTH RELIABLE SWEEPING ACTION: Industry-leading 5.6 to 1 brush-to-wheel ratio and adjustable brush height help deliver consistent sweeping performance across lawns
- CONVENIENT TOW-BEHIND OPERATION: Adjustable hitch positioning and dump-from-seat handle allow easier towing setup and faster debris unloading without leaving the tractor seat
- DURABLE LONG-LASTING CONSTRUCTION: Bronze brush shaft bushings and large 12 in x 3 in tires provide enhanced durability and smoother towing performance over terrain

- 42" Wide Sweeping Path for Faster Cleanup :Cover more ground in less time with a 42-inch extra-wide sweeping width. Upgraded 10.5" diameter brushes with reinforced metal-to-brush connection improve pick-up efficiency for leaves, grass clippings, and debris in fewer passes.
- Tool-Free Height Adjustment for All Terrains :Easily adjust brush height with a convenient lever—no tools needed. Delivers optimal performance on lawns, driveways, sidewalks, and uneven ground for consistent, thorough cleaning.
- 12 Cu.Ft. Large Capacity Hopper with Easy Dumping :High-capacity non-woven collection bag reduces frequent emptying. Equipped with a dumping rope and protective cover, allowing quick, mess-free disposal directly from your tractor seat.
- Universal Hitch for Effortless Towing :Designed to attach easily to most lawn tractors, riding mowers, and ATVs. Let the rotating brushes do the work—quickly collect leaves, pine needles, and small debris with minimal effort.
- Pre-Assembled Design & Space-Saving Storage :Comes partially pre-assembled to reduce setup time, with clear instructions and video guide included. Foldable design allows compact storage in sheds or garages, keeping your space organized.

- Extra-Wide 48-Inch Sweeping Path: This orange lawn sweeper tow behind features a 48-inch wide working width, allowing you to quickly and efficiently collect fallen leaves, grass clippings, and Other dry debris. Achieve fast and efficient cleaning results and return your lawn, garden or patio to a clean and tidy environment.
- Large Capacity Hopper with Convenient Dumping Rope: Designed with a 25.16 cubic foot large capacity hopper, this pull behind lawn sweeper holds more debris for fewer dumping trips. Easily empty the hopper without leaving your seat, thanks to the integrated easy dumping rope system.
- Universal Hitch and Brush Height Adjustment Lever – Our tow leaf sweeper for lawn comes with a universal hitch that easily attaches to most lawn tractors, UTVs, and ATVs. The simple lever allows tool-free brush height adjustment, ensuring excellent sweeping results on driveways, sidewalks, gardens, and lawns.
- Space-Saving Foldable Design - After use, easily fold the leaf sweeper tow behind for riding mower for compact storage. Hang it on a garage wall or store it in a shed to maximize your space and keep your yard tools organized.
- Heavy-Duty and Durable Construction - Built with a heavy-duty steel frame and abrasion-resistant nylon bristles, this heavy duty lawn sweeper delivers reliable performance across rough, wet, and standard terrains. The large capacity hopper features a reinforced PVC bottom for added durability and long service life.
The Ultimate Buying Guide for Your Pull-Behind Lawn Sweeper
A pull-behind lawn sweeper is a fantastic tool. It helps you clean up leaves, grass clippings, and small debris quickly. This guide will help you choose the best one for your yard work.
Key Features to Look For
When shopping, look closely at what the sweeper offers. These features make a big difference in how well it works and how long it lasts.
Hopper Capacity
The hopper is the big bag or bin that collects the debris. Bigger yards need bigger hoppers. A small hopper means you stop often to empty it. Check the volume, usually measured in bushels. For a small yard, 15–20 bushels might be enough. For large properties, look for 25 bushels or more.
Brush Height Adjustment
You must adjust the brushes for different tasks. You need to lower the brushes for thick leaves. You raise them for just light clippings. Easy-to-use height adjustment levers are important. Good sweepers let you change the height without tools.
Wheels and Tires
The wheels move the sweeper. Large, sturdy wheels handle bumpy ground better. Pneumatic (air-filled) tires offer a smoother ride than solid plastic ones. Good tires prevent sinking into soft grass.
Towing Hitch
Make sure the hitch works with your lawn tractor or ATV. Most use a simple pin hitch. Test how easily it connects and disconnects.
Important Materials Matter
The materials determine the sweeper’s strength and lifespan. Strong materials mean less breaking and more cleaning power.
Frame Construction
Look for a strong steel frame. Powder-coated steel resists rust. Avoid frames made of thin, lightweight metal. A heavy-duty frame handles heavy loads of wet leaves better.
Hopper Material
Hoppers are often made of heavy-duty fabric or durable plastic. Fabric bags are lighter but can tear. Plastic hoppers last longer and are easier to dump. Ensure the fabric is UV-resistant so sunlight does not weaken it quickly.
Brush Material
The brushes usually use stiff plastic or nylon bristles. These bristles must be tough enough to flick debris into the hopper. Check how replaceable the brushes are. Easy replacement saves money later.
Factors That Improve or Reduce Quality
Quality isn’t just about the price tag. How the parts work together really matters.
Wide Sweeping Path (Improve Quality)
A wider path cleans more ground in one pass. Sweepers often come in 38-inch, 42-inch, or 46-inch widths. Wider paths save you time and fuel.
Brush-to-Wheel Engagement (Improve Quality)
The best sweepers use a direct gear drive connected to the wheels. This means the speed of your tractor directly controls the speed of the brushes. This system works well even when you slow down.
Complex Assembly (Reduce Quality)
If the initial setup takes hours and requires many tools, the overall quality might be lower. Good designs offer quick, simple assembly.
User Experience and Use Cases
Think about how you will actually use the sweeper.
Ease of Dumping
Dumping the hopper should be simple. Many models use a rope or lever system to empty the contents behind the tractor. Test this feature in your mind: can you reach the lever easily while seated?
Storage
Where will you keep it? Many quality sweepers fold up. Folding allows you to store them upright in a smaller space, like a garage corner.
Use Cases
- Fall Cleanup: Heavy work picking up thick layers of dry and wet leaves.
- Spring Detritus: Removing pine needles, small twigs, and winter debris.
- Lawn Maintenance: Lightly sweeping up grass clippings after mowing to keep the lawn looking neat.
Frequently Asked Questions (FAQ)
Q: What size tractor do I need to pull a lawn sweeper?
A: Most standard lawn tractors with at least 10 horsepower can easily pull a medium-sized sweeper. Check the manufacturer’s minimum tow weight requirement just to be safe.
Q: How fast should I drive when using the sweeper?
A: You should drive slowly, usually between 2 to 4 miles per hour. Driving too fast makes the brushes spin too fast, and debris flies out instead of going into the hopper.
Q: Do I need to grease or maintain the brushes?
A: Yes, most models have grease fittings on the axle bearings. Follow the manual for lubrication schedules. Keeping the bearings greased prevents rust and sticking.
Q: Can a pull-behind sweeper pick up pine cones?
A: Small, light pine needles are usually no problem. Larger, heavy pine cones might be too big for standard sweepers. Look for models specifically rated for heavy debris if you have many large cones.
Q: Will the sweeper damage my grass?
A: If you set the brush height correctly, no, it will not damage your lawn. If the brushes are set too low, they can tear up the turf, especially when picking up wet leaves.
Q: How do I clean the hopper bag?
A: For fabric bags, you can usually use a stiff brush or a leaf blower to clear out fine dirt. If the bag is heavily soiled, you might remove it and hose it down, but make sure it dries completely before storing.
Q: Are powered sweepers better than non-powered ones?
A: Non-powered sweepers are simpler and cheaper. They rely on the tractor’s movement. Powered sweepers use a separate engine or PTO (Power Take-Off) to spin the brushes, offering more consistent cleaning power, but they cost much more.
Q: What is the warranty usually like?
A: Most reputable brands offer a one-year warranty covering manufacturing defects. Extended warranties might cover the frame for longer periods.
Q: Can I use the sweeper in the rain?
A: It is best to avoid using the sweeper in heavy rain. Wet leaves are very heavy, and they can clog the brushes or strain your tractor. Light dew is usually fine.
Q: How do I winterize my lawn sweeper?
A: Clean all debris off the unit. Lubricate all moving parts and hinges. Store the sweeper in a dry place, preferably covered, to protect the fabric and plastic from harsh winter elements.